

Dried Plants Care Guide for Sustainable Decor
Many dream of green plants at home but find their care troublesome and time-consuming. Watering, pruning, and the right light require commitment that doesn't always fit into everyday life. Dried plants offer a smart alternative that combines aesthetics with minimal care. They retain their shape and color for months, sometimes years, without hassle. This guide shows you exactly how to care for dried plants to maximize their lifespan and maintain their natural beauty in your home.
Table of Contents
Key Insights
| Point | Details |
|---|---|
| Long durability | Dried plants retain shape and color for months to years with proper care. |
| Ideal drying environment | They thrive best in a dry, cool, and dark environment away from direct sunlight. |
| Gentle handling | Use gentle tools as dried plants are delicate. |
| Clean carefully | Clean plants gently with a soft duster or brush to maintain their appearance longer. |
| Importance of the vase | The vase should be heavy enough and have the right opening for the stems. |
What you need to care for dried plants
Proper preparation saves time and trouble later. You don't need much, but what you choose directly affects the result. Let's go through exactly what is required for optimal care.
Materials and tools
Basic equipment is easy to acquire. You need good quality dried plants, a suitable vase, possibly hairspray with medium to strong hold, and a soft duster or brush for cleaning. Dried flowers and plants require minimal care and are durable interior solutions that can last 6-12 months up to several years with proper care. Choose tools that are gentle as dried plants are delicate and easily damaged by rough handling.
The vase plays a bigger role than many think. For dried plants, a decorative vase is sufficient as no water resistance is needed, but if you choose a water-resistant and decorative vase, you get the flexibility to switch between dried and fresh arrangements. The vase should have sufficient weight to keep the plants stable and an opening that fits the thickness of the stems. Light vases tip over easily, especially with tall arrangements like pampas grass.
Optimal environment for placement
The environment determines how long your plants retain their appearance. Dried plants thrive best in a dry, cool, and dark environment away from direct sunlight. Sunlight quickly fades colors and makes the material brittle. Humidity is the biggest enemy as it causes mold and discoloration within days.
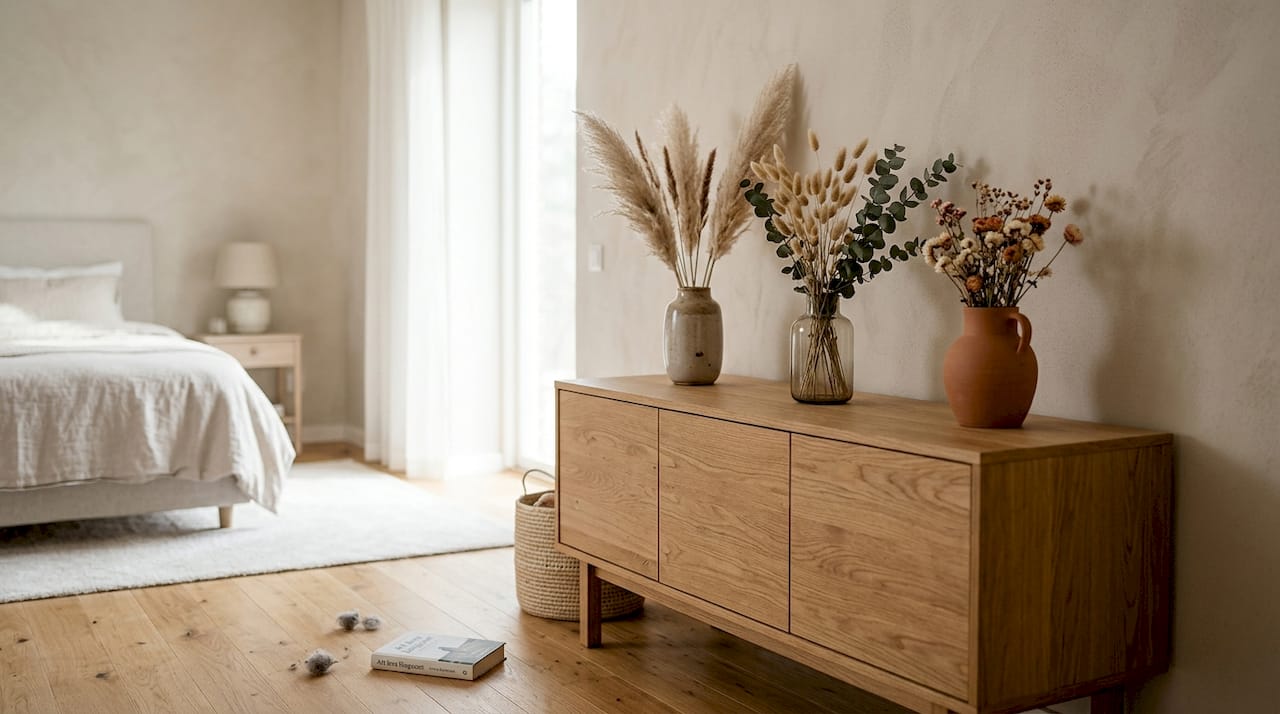
Avoid placing near windows with strong afternoon sun, bathrooms with high humidity, or kitchens where steam from cooking reaches the plants. Perfect locations include living rooms with indirect light sources, bedrooms with stable temperatures, or offices without extreme temperature fluctuations. Stability in the environment is key.
Pro tip: Place dried plants at least one meter away from heating elements and air conditioning. Constant airflow dries them out too much and increases the risk of crumbling. A stable location with minimal disturbance gives the best results.
Preparation before arrangement
Before arranging the plants, inspect them carefully. Remove any damaged parts or loose leaves that may fall off later. Trim stems to the desired length with sharp scissors for clean cuts. Rough cuts with dull tools damage the tissue and increase crumbling.
Properly preparing the space from the start minimizes future adjustments that could damage the plants. Think through the arrangement before finalizing its placement. Decorating with unique vases requires planning to create harmony between plant and vessel.
| Preparation step | Purpose | Time required |
|---|---|---|
| Inspection | Identify damage | 2-3 minutes |
| Cleaning | Remove dust and debris | 3-5 minutes |
| Trimming | Adjust length | 5-10 minutes |
| Arranging | Plan final appearance | 10-15 minutes |
| Fixing | Secure position in vase | 2-3 minutes |
In total, preparation takes 20-35 minutes depending on the complexity of the arrangement. The time is well invested as it prevents problems and yields a professional result.
How to dry and prepare plants at home
Drying your own plants at home is easier than you think. The process requires patience but minimal active time. The right method from the start ensures beautiful results that last for years.
Step-by-step drying
-
Pick plants at the right time. Harvest in the morning after the dew has dried but before the midday heat. Plants in full bloom yield the best results. Avoid plants with visible damage or diseases.
-
Prepare bunches for hanging. Tie 3-5 stems together with rubber bands or string. Small bunches dry more evenly than large ones. Leave space between bunches for air circulation.
-
Hang upside down in an optimal environment. Attach bunches to rafters, clotheslines, or hooks in a dark, dry space. Hang upside down in the dark for home drying, avoiding humid environments, in contrast to living plants. Attics or storage rooms work excellent.
-
Wait patiently during drying. Normal drying time is 1-3 weeks depending on the plant type and humidity. Thick stems take longer than thin ones. Check the plants weekly by gently feeling them. Completely dry plants feel light and papery.
-
Check regularly for even drying. Flip the bunches if one side appears drier than others. This ensures even color retention and reduces the risk of mold on damp parts.
Pro tip: Test dryness by gently bending a stem. If it snaps cleanly, the plant is fully dried. If it bends or feels damp, more time is needed. Haste ruins the result.
Common mistakes to avoid
Moisture is the biggest culprit. If you dry plants in bathrooms, basements, or other damp areas, you risk mold that will ruin the entire batch. Humidity above 60% makes drying almost impossible. Invest in a dehumidifier if your home has high humidity year-round.
Direct sunlight during drying dramatically fades colors. What starts as beautiful red roses becomes pale pink shadows. Darkness preserves pigments perfectly. Cover windows with curtains or choose a windowless space.
Warning: Humid environments destroy dried plants faster than anything else. A single humid night can cause mold that spreads throughout the entire arrangement within days. Always choose the driest place available.
If you overload the bunches, the inside dries slower than the outside. This creates uneven quality and increases the risk of rot from within. Keep bunches small and airy. It's better to dry more small batches than to risk large ones.
To reduce shedding of pampas grass and other plants requires gentle handling throughout the drying process. Avoid touching the plants more than necessary while they are drying.
Care and maintenance for long durability
Once the plants are dried, the real maintenance begins. Proper routines extend their lifespan from months to years. Let's go through exactly what is required for optimal long-term care.
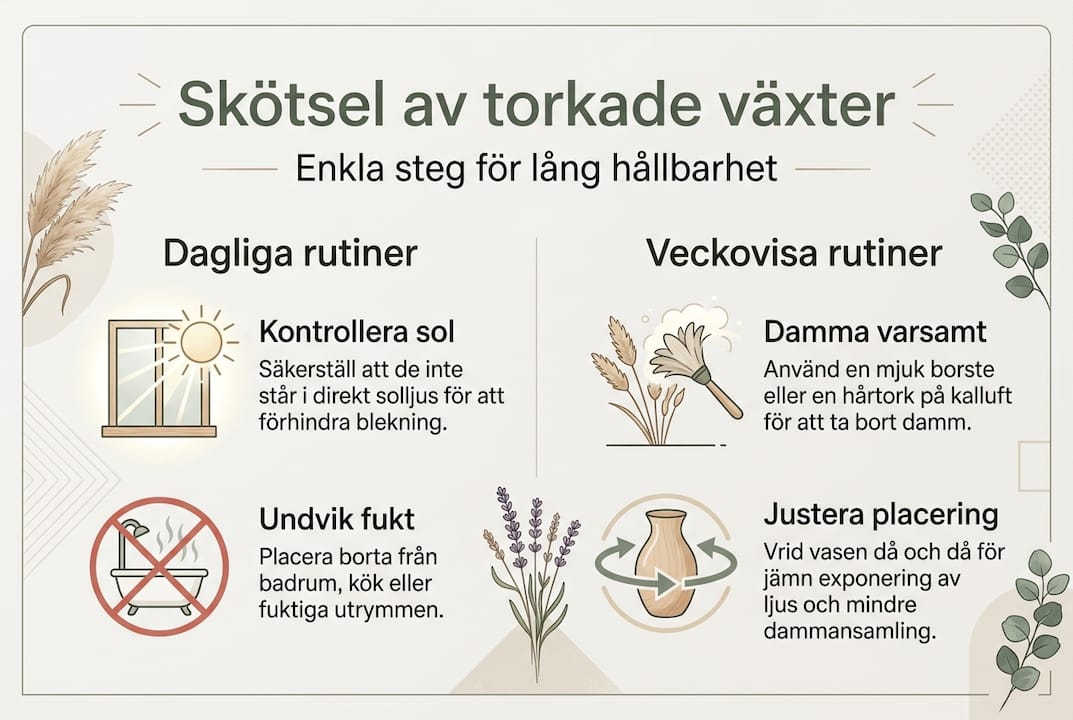
Daily and weekly routines
Daily care is minimal but important. Check that the plants are not exposed to direct sunlight through windows as the sun moves during the day. The sun's angle changes with the seasons, so a place that is shady in winter may become sunlit in summer. Adjust placement as needed.
Weekly dusting keeps the plants fresh. Use a soft brush or duster and gently stroke over leaves and stems. Work from top to bottom to avoid pushing dust into the arrangement. Never use water or damp cloths as this rehydrates the plants and starts the decomposition process.
Avoid placing near heaters, stoves, or other heat sources. Heat dries out the plants too much and makes them extremely brittle. Keep at least one meter away from all heat sources. Air conditioning has a similar effect by creating constant airflow that dries out the material.
Hairspray for extra durability
Use hairspray with medium to strong hold after drying for extra durability and reduced crumbling by applying 2-4 thin layers at a distance of 20-30 cm. This creates a protective film that binds the plant tissue and reduces crumbling by up to 60%. The technique is simple but requires precision.
Hold the spray 20-30 cm from the plant and apply in sweeping motions. Cover the entire surface evenly without over-wetting any part. Let each layer dry for 10-15 minutes before applying the next. Two to four thin layers give better results than one thick one, which can make the plants sticky.
Choose unscented or lightly scented spray to avoid strong odors that can be overwhelming indoors. Inexpensive spray bottles work just as well as expensive brands. It's the coverage and number of layers that count, not the price.
Pro tip: Spray outdoors or in a well-ventilated area to avoid inhaling aerosols. Let the plants air dry completely before bringing them indoors. This takes 30-60 minutes depending on humidity.
Comparison of care methods
Different methods yield different results. Here is an objective comparison based on real-world use over time.
| Care Method | Durability | Appearance after 6 months | Effort | Cost |
|---|---|---|---|---|
| No treatment | 6-9 months | Faded, crumbling | Minimal | 0 SEK |
| Hairspray 2-4 layers | 12-18 months | Well-preserved, minimal fading | Low, 30 min initial | 50-100 SEK |
| Regular dusting | 10-14 months | Clean, natural | Medium, 5 min/week | 0-50 SEK |
| Combination spray + dusting | 18-36 months | Excellent, like new | Medium | 50-150 SEK |
| Professional preservation | 3-5 years | Perfect | None required | 300-800 SEK |
The combination of hairspray and regular dusting gives the best results for individuals. Professional preservation is overkill for most home environments but may be worth it for special arrangements or commercial installations.
To fluff pampas grass after drying requires careful handling combined with the right spray treatment to maintain volume without damaging the structure.
Common problems and solutions
Crumbling is the most common problem. It occurs when plants become too dry or are exposed to vibrations. Place arrangements on stable surfaces away from slamming doors or areas with a lot of movement. Every time someone walks by and creates a draft, crumbling increases.
Fading happens gradually over time but is accelerated by sunlight. If your plants start to lose color, move them to a darker place immediately. The damage is permanent, but further fading can be stopped. Accept that some color change is natural and can even add vintage charm.
Odor can develop if plants were not dried properly from the start. Moisture residues inside thick stems begin to rot and smell. If this happens, remove the affected plant immediately to prevent spread to the rest of the arrangement. Prevent this by ensuring complete drying before arranging.
Discover our range of dried plants and vases
Now that you've mastered the care, it's time to find the right products. The quality of your dried plants determines how easy maintenance will be and how long they retain their beauty.

Torrdecor offers a carefully selected range of sustainable dried plants and matching vases that simplify the entire process. Our dried bouquets are professionally pre-dried for maximum durability straight out of the packaging. You don't have to guess if they are dry enough or worry about mold.
Our quality vases in white clay from Portugal are designed specifically for dried arrangements. They combine aesthetics with functionality and provide stable bases that keep your plants secure for years. Each vase is handmade with care for both form and durability. Visit us for inspiration and find exactly what your home needs to create beautiful, easy-care decor that lasts.
Frequently asked questions about caring for dried plants
How long do dried plants last?
With proper care, dried plants last 6-12 months on average, but can extend to several years. Placement away from sunlight and humidity, as well as regular dusting, significantly prolongs their lifespan. Hairspray treatment can extend durability by an additional 6-12 months.
Can hairspray be used on all dried plants?
Yes, hairspray works on most dried plants, including flowers, grasses, and leaves. Only avoid extremely delicate plants with very thin petals that might become too heavy from the spray. Always test on a small part first if unsure.
How do you best clean dried plants without damaging them?
Use a soft brush or duster and gently stroke from top to bottom. Work with light movements without pressing hard. Alternatively, you can use a hairdryer on the coolest setting at a low distance to blow away dust. Never use water or damp cloths.
Where should dried plants be placed for best durability?
Perfect locations are living rooms, bedrooms, or offices away from windows with direct sunlight. Avoid bathrooms, kitchens, and other humid areas. Keep at least one meter away from heating elements and air conditioning. Stable surfaces without vibrations provide the longest lifespan.
Can you easily dry plants yourself at home?
Absolutely, home drying is easy with the right method. Hang small bunches upside down in a dark, dry environment for 1-3 weeks. Attics, storage rooms, or unused rooms work excellently. The key is patience and avoiding moisture throughout the process. The result will be as good as purchased dried plants.